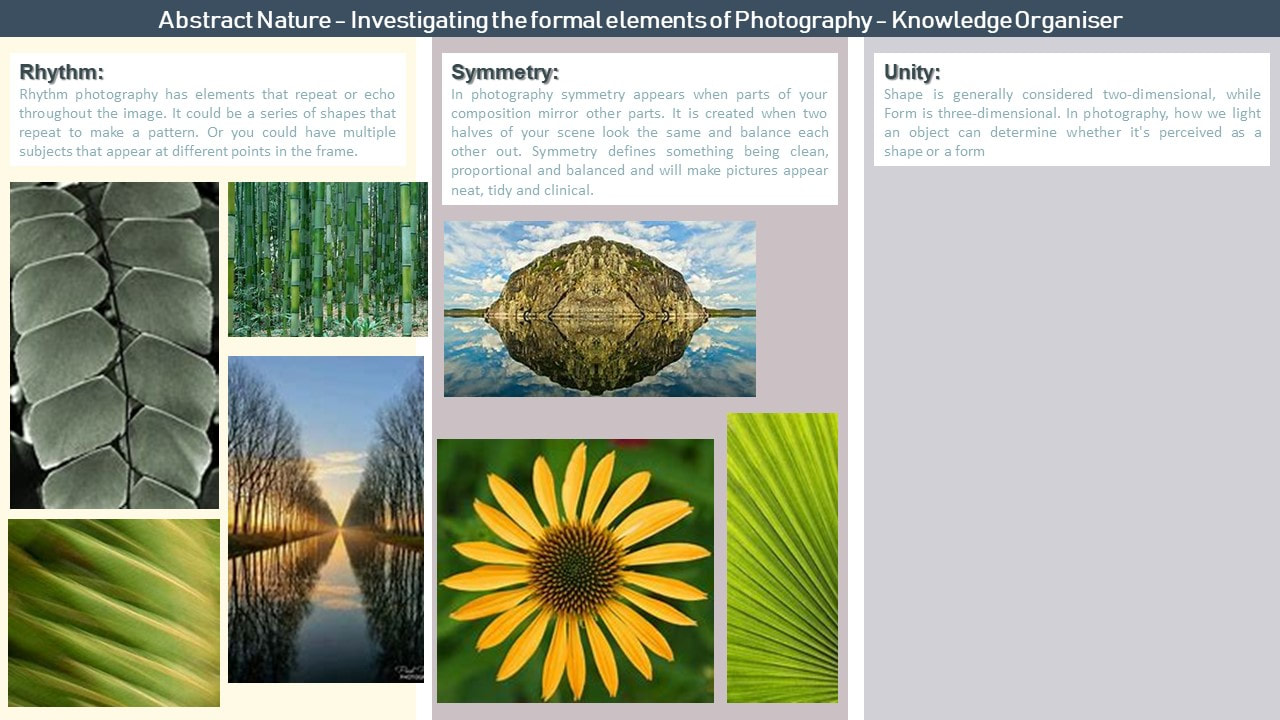
Abstract Nature: Personal project 1

Abstract Nature: What is abstraction
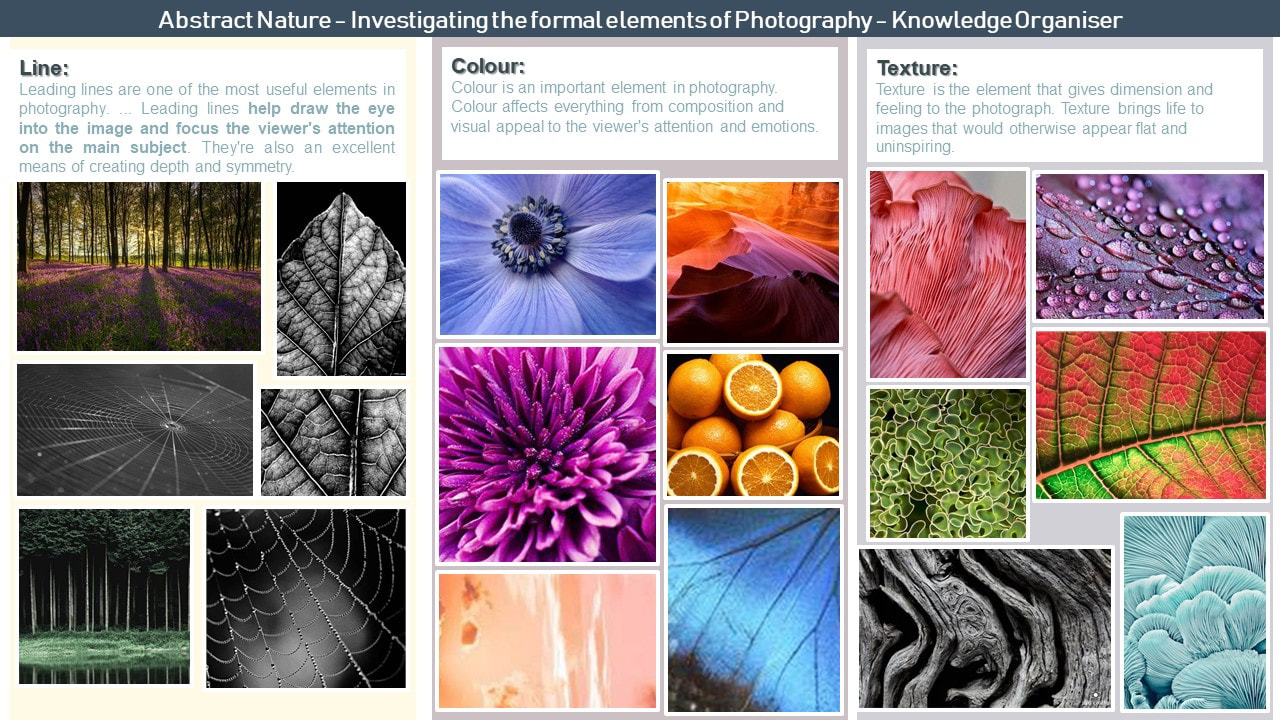
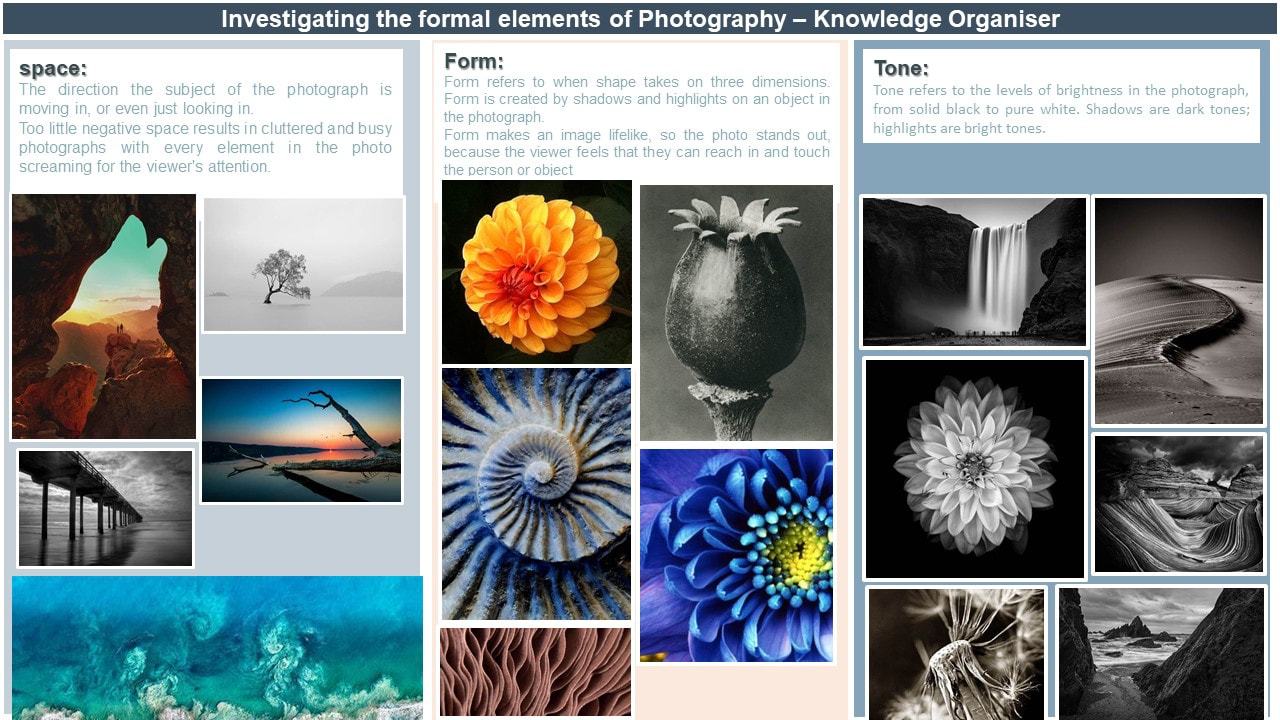
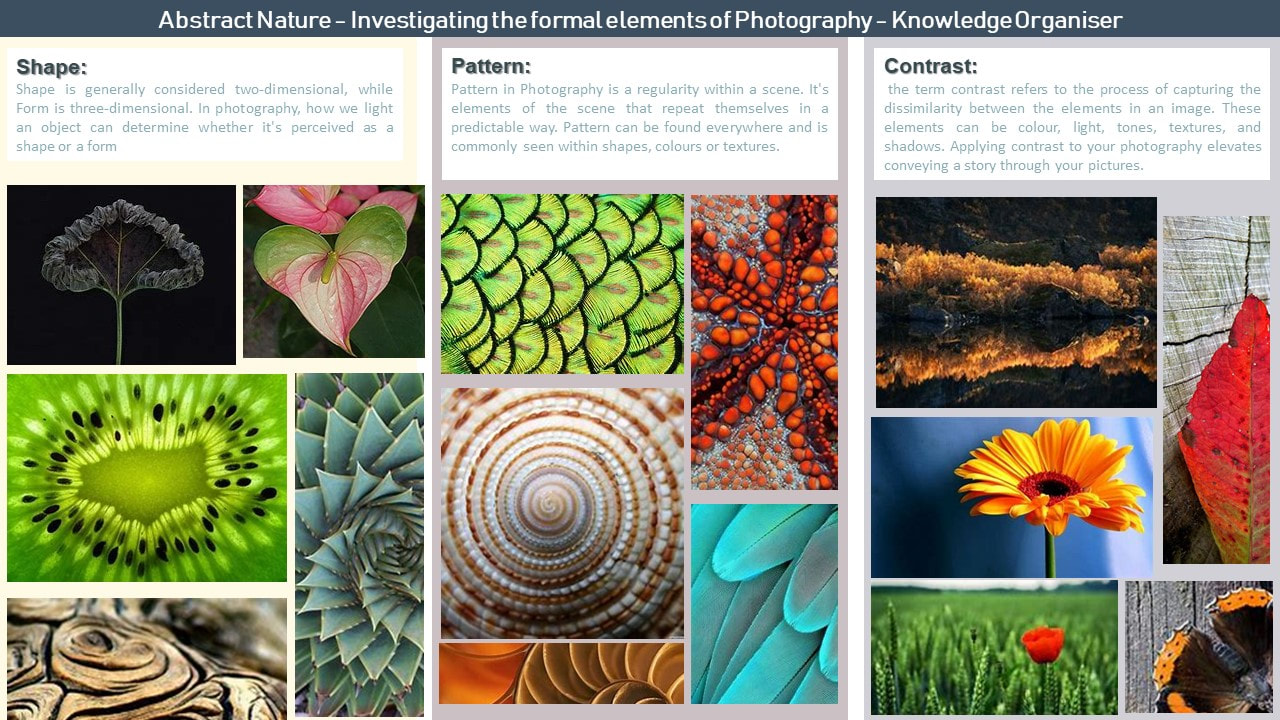
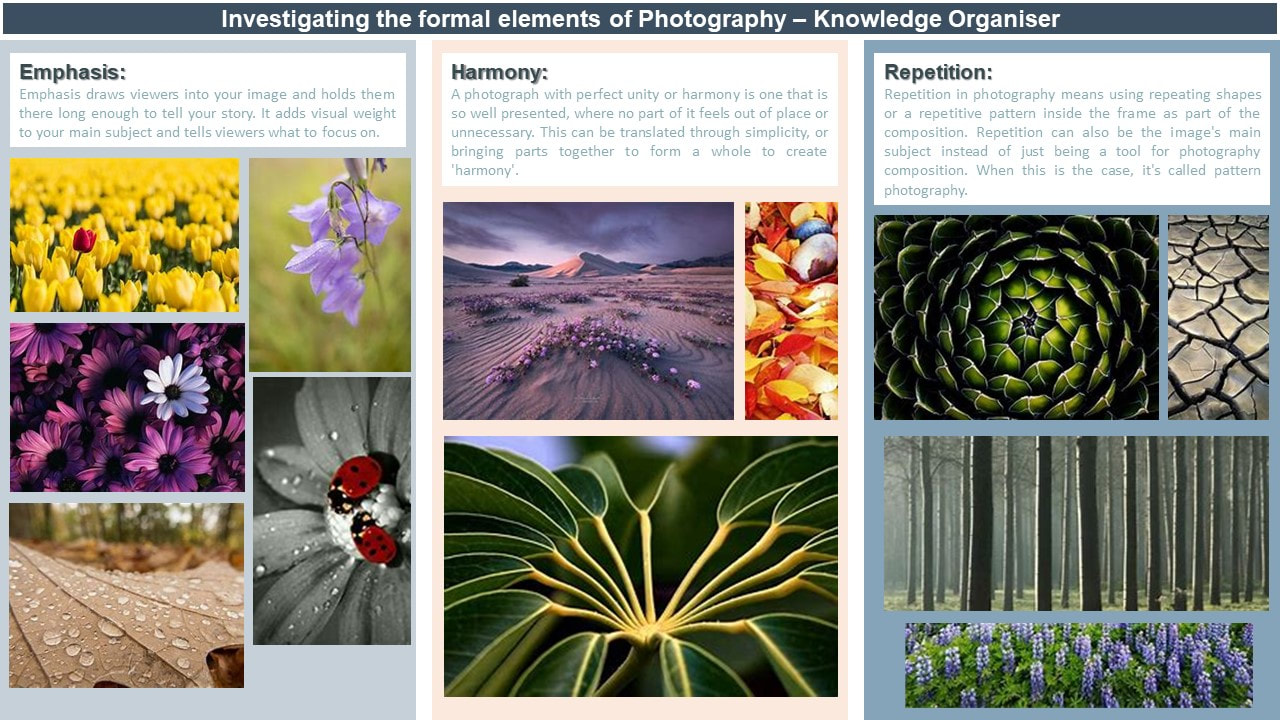
Abstract photography, sometimes called non-objective, experimental or conceptual photography, is a means of depicting a visual image that does not have an immediate association with the object world and that has been created through the use of photographic equipment, processes or materials. Abstract photography focuses on The elements of art: line, shape, texture, form, colour, tone, space. and the principles of design: balance, harmony...etc. These are known as the formal elements of photography. Below are some examples of abstract photography that inspires my initial research into the formal elements of photography.


Abstract Nature: INVESTIGATION OF ABSTRACT PHOTOGRAPHY TECHNIQUES/Monochromatic photography, ICM and shallow depths of field.
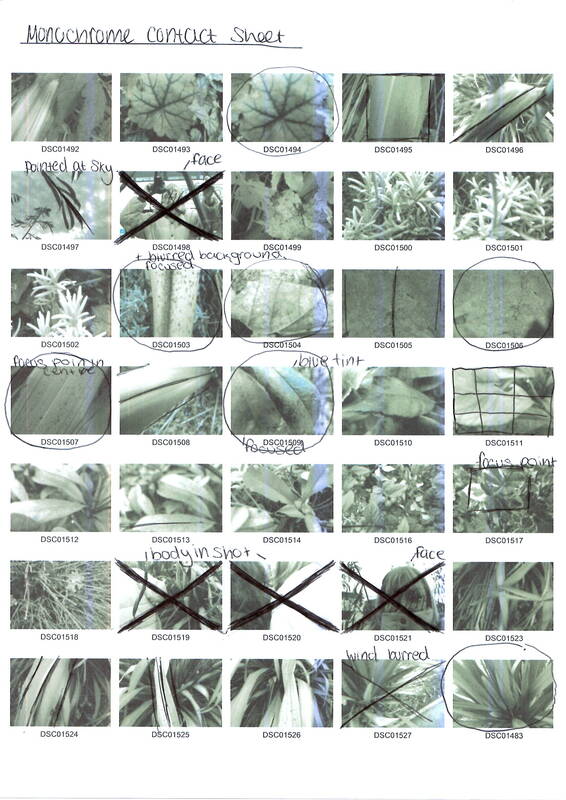
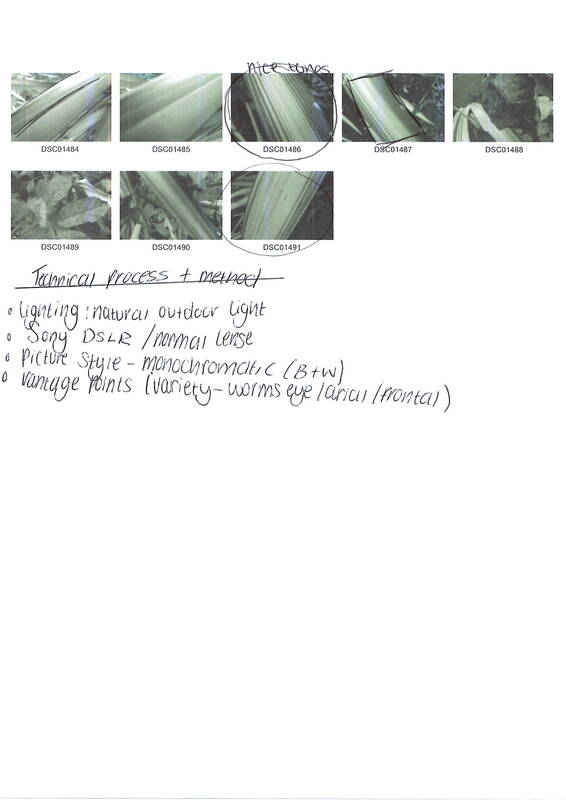
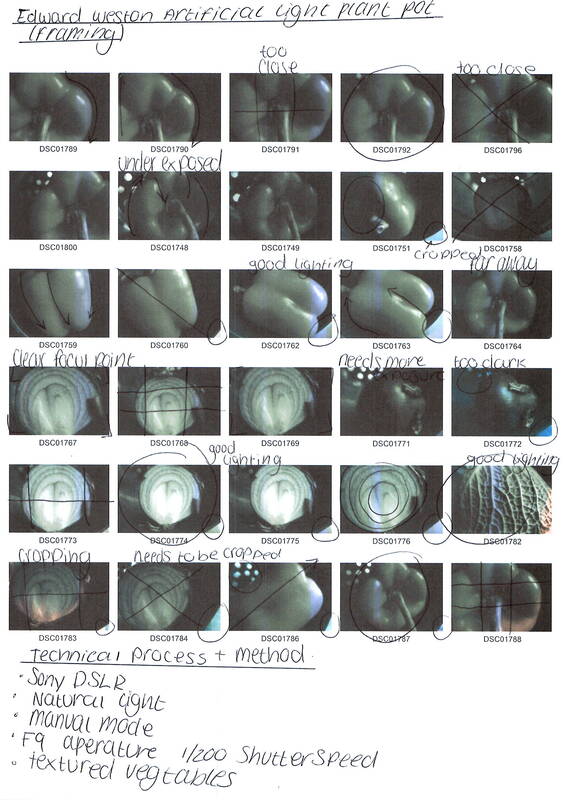
Monochromatic Photography Shoot, Contact sheets:
|
|


|
I used the AV setting on my camera and switched the style to black and white. I adjusted my aperture to the smallest it could be. To get the pictures, I used different close up shots of many different plants.
I made sure to blur out any background that wasn't a natural form as to really focus on the main point of my picture. A few of my pictures had a blue tint on them which I believe gave them a nice slight touch of colour. I even made sure to include dead plants as well as alive ones in my photographs. I made sure the main focus point of the picture was almost directly in the centre as to not draw any attention to anywhere else such as the background. On this particular shoot I struggled to get a still focused shot of the plant because of the strong winds. If I was to do this again I would do it on a not so windy day. |

|

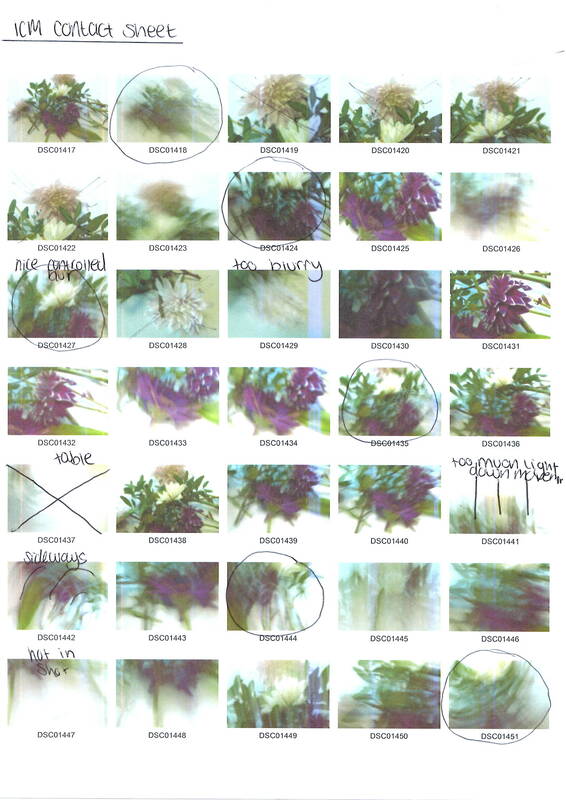
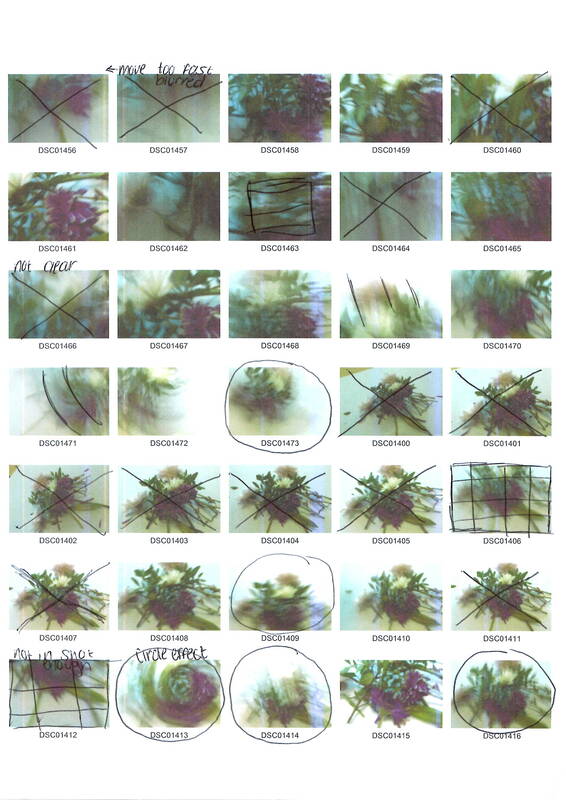
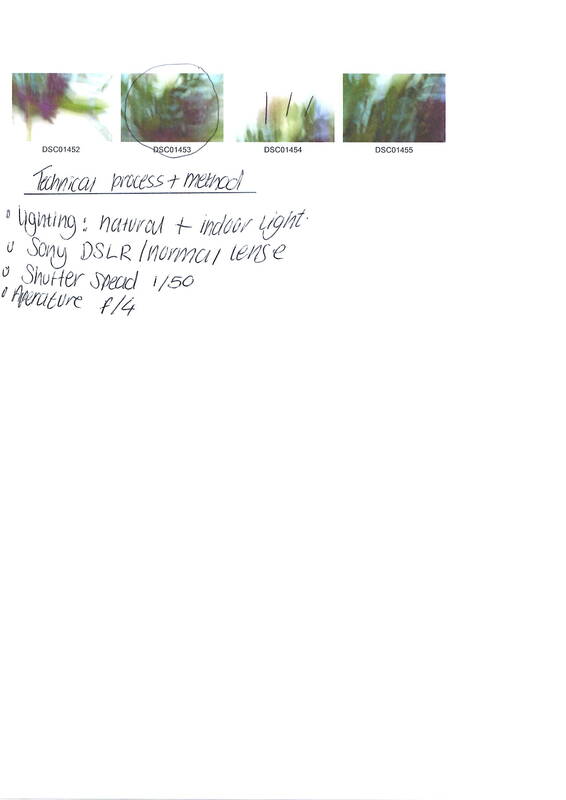
ICM - Intentional Camera Movement Shoot, Contact sheets:
|
|
|


|
I used the AV setting on my camera and switched the style to shutter speed priority. I adjusted my aperture to the largest it could be. To get the pictures, I used different close up shots and wide shots of a few flowers and leaves I arranged.
I made sure to blur out any background that wasn't a natural form as to really focus on the main point of my picture. I made sure the main focus point of the picture was almost directly in the centre as to not draw any attention to anywhere else such as the background. To get my photographs when I took the photo I made a quick and sudden movement with the camera to create a blurred effect. On this particular shoot I struggled to get a shot with the right amount of exposure and if I was to do it again, I would research how to use my camera in a much better way. |

|


Shallow Depth of field shoot


|
For this shoot I took images close up and blurring the background to emphasise the main focal point of the image.
On this particular shoot I struggled to actually take photographs because my camera did not have the correct settings to complete this shoot. Although, once I had finally done it I found it very easy to shoot with the correct exposure and lighting. I used my Sony DSLR camera on AV mode. The photos are taken outside on a sunny day and some had just been watered so water droplets can be seen on the petals and leaves. |

|

|
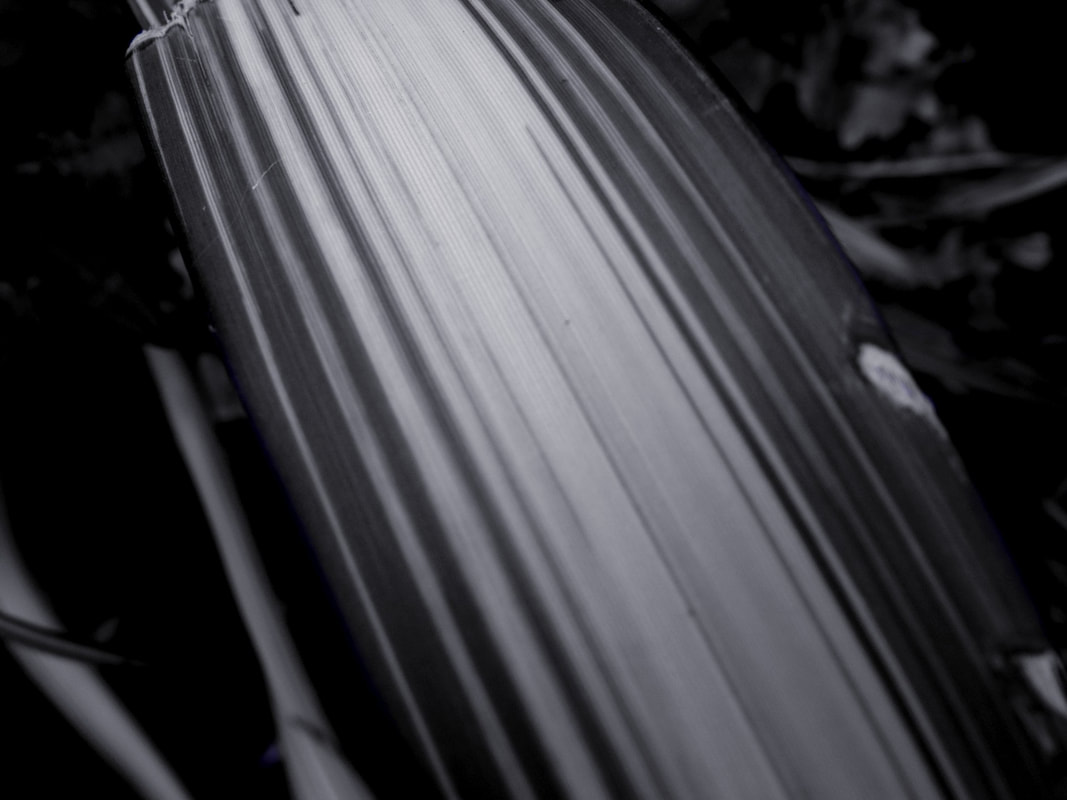
Best images:
|
For this image I like how the lightest part of the picture is directly in the centre and in progressively becomes darker towards the edges and background of the photo. You can clearly see the details of the image however towards the bottom it becomes slightly blurred and not very sharp.
To edit this photo I wanted to really empathise the darks and the lights of the leaf itself. So I made the darks darker and the lights lighter by using the adjust tool and levelling it. I added a slight blue tint to the image to give it a cooler tone. To shoot this photograph I used my Sony DLSR with the normal lens. I adjusted it to the monochrome mode. |

|
I really like this image because of the blue tint which my camera gave to it. The background is blurred out while the focus point of the image is directly in the centre and is sharp and focused. You can see all the details on the leaf because of the editing I did.
To edit this photo, I used Pixlr-E and adjusted the levels of light and dark using the curve tool and experimented with different settings of the picture. I also added a very slight blue tint over my photo to really enhance the blue that my camera gave the original picture. To shoot this photograph I used my Sony DSLR with the normal lens. I adjusted it to the monochrome mode. |
|
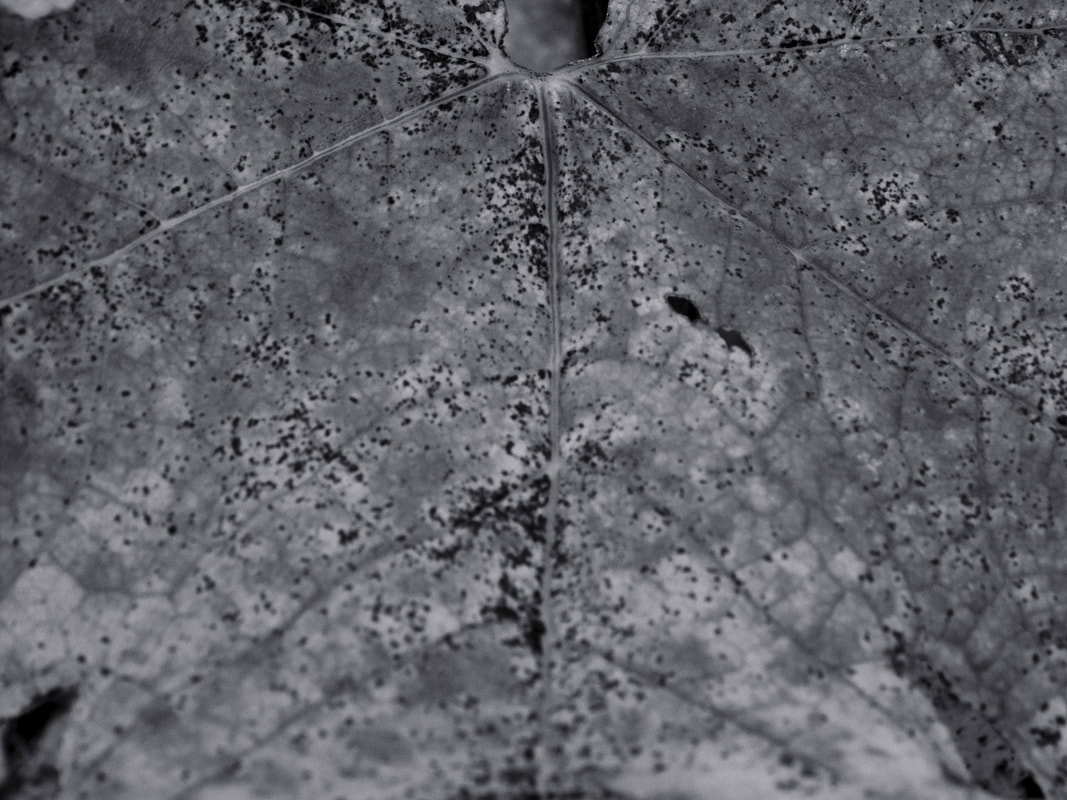
This photo is one of my bests because of how close and focused the camera actually is to the leaf itself. You can very clearly see every little black dot of detail around the leaf and the lighter spots if the leaf are very visible. The darker veins of the leaf are a very nice detail against the lights spots mainly towards the bottom of the leaf. If I was to change one thing about this photograph, I would maybe crop the bottom of the photo off as it gets slightly blurry towards the end of the leaf. This is most likely due to the windy conditions this shoot was done in.
To edit this I messed around with the different colours of the leaf by making them lighter and darker using the curve and level tools on the software I was using. I also added a slight blue tint over the imager to again give it that cooler black and white tone. and to add a slight pop of colour against the monochrome image. To shoot this photograph I used my Sony DSLR with the normal lens. I adjusted it to the monochrome mode. |
|
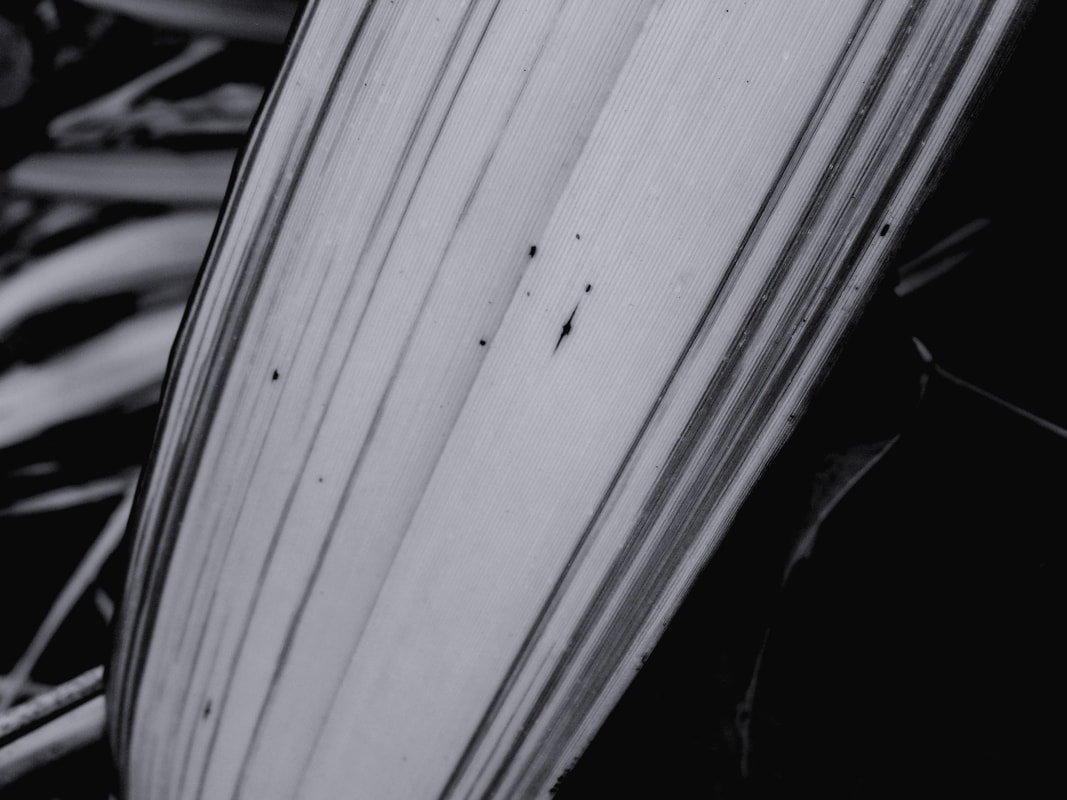
I think this is my most successful edit because of how I made the background almost completely dark but still have slight detail in it whilst the other side has a lot of detail in it but is blurred enough so that your focus point is the leaf in the middle. I think I have taken this photograph extremely well and there isn't much I would change about it. The darks are clearly dark and the lights are clearly lights. I especially like the small black detail of the dots towards the middle of the photograph which contrast the very white/ grey background of the leaf.
whilst editing this photograph I made sure to not make the white of the leaf completely white as to not eliminate any details the leaf has. Instead, I opted for a more grey scale. To shoot this photograph I used my Sony DLSR with the normal lens. I adjusted it to the monochrome mode. |
Artist Investigation / Edward Weston
''For photography is a way to capture the moment - not just any moment, but the important one, this one moment out of all time when your subject is revealed to the fullest - that moment of perfection which comes once and is not repeated.''
Why this quote?
I chose this inspirational quote because it sums up what photography is really about- capturing a moment in time that will never happen again. It shows how emotional and special a photograph can be. Below are a selection of 10 Weston images that are inspirational to me because of the media which is used in such an effective way. |
Why this artist?
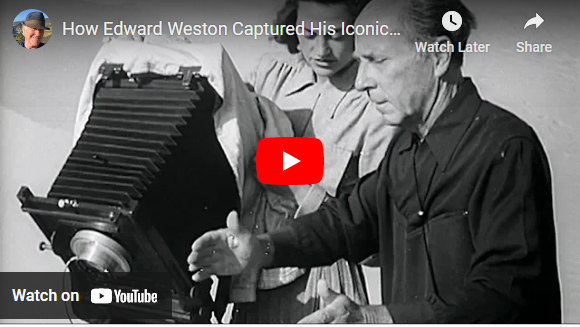
To begin my Abstract nature. I will initially study the work of Edward Weston because of the type of photography he uses and how it closely links to our topic; which is abstract nature. His work from the early 1920's to 1930's exhibited lots of things such as: Peppers, Seashells and lots of strange environments. Who is he? Edward Weston was born 24 March 1886, Highland Park, Illinois, United States and is known for his unusual yet memorable work in photography. During his career, Weston explored a range of genres and subjects. He's well known for his work photographing landscapes, still-lifes, nudes, and portraits. Why this Video? This video is inspirational to me because it shows how detailed and intricate it was to create a photograph back then. It shows a way of photography that isn't very practised anymore because of digital photography. It fascinates me to see how he used to create such beautiful images while only having what he had. |


SEMI Analysis / Edward Weston
|
Subject:
The photographer of this image is called Edward Weston. The title of this photograph is ''Pepper No. 30'' and was created in 1930. The genre of this photograph is still life and abstract. The props I can see in this picture are: a misshapen pepper, a funnel - which the pepper was placed into to give it a tunnel effect. Element: The composition of the photo shows the pepper in the centre- middle ground- of this photograph. And the rule of thirds has been used. The viewer's eye is lead around the photo because of the composition and perspective Edward Weston has used. The perspective that Weston has taken the photo from is at eye level. The perspective is effective because of the tones and unusual shapes the pepper has, and how they make your eyes move along the lines and textures of the photograph. The Photographer employs a range of visual elements in his work, The most striking elements are: Tone, Texture, Shape, Form. He uses tone because his image is in black and white, Because of the analogue camera which he uses. Texture is used by the unusual and misshapen pepper which he has cleverly used in such an effective way. It gives such amazing depths and tones to the photo that you would never look at in normal life. The shape of the pepper resembles something almost human, like a spine or a back. Media: The photo has been taken from a short distance. This is so the background is hardly seen and the main focus point of the image is in the direct centre of the photo. The pepper has been placed in the middle ground. By doing this, the viewer's eyes are lead firstly to the light centre of the photograph and move more towards the dark background of the image. The photo has been taken using a studio using a light source which has been placed over the top of the pepper so that the light reflects off of it. This creates an atmosphere because of the shadows which contrast and surround the pepper. Intent: I feel this photo conveys a message of how there is a strange beauty in such odd things we would normally deem as 'Ugly' and throw away. Edward Weston would usually take photographs of 'normal' objects that he thought were visually intriguing. I really enjoy this type of abstract photography. This is relevant to my project because of how he uses natural forms and takes photos of them. This photograph has many strengths such as how it was taken such a long time ago and is so ahead of its time. And also how it uses depth and tone successfully. |

|


Edward Weston: Contact Sheet
|
|
Editing Process Low Key Photography / Edward Weston
Best Edit / Edward Weston
|
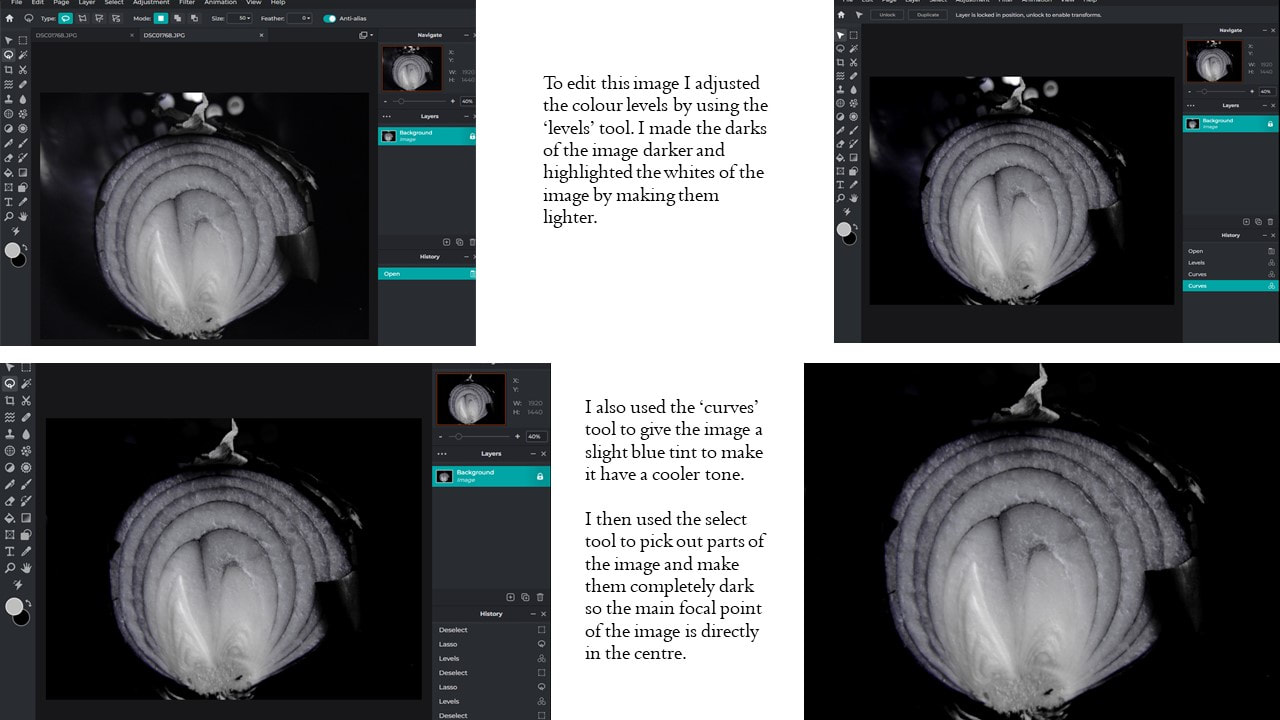
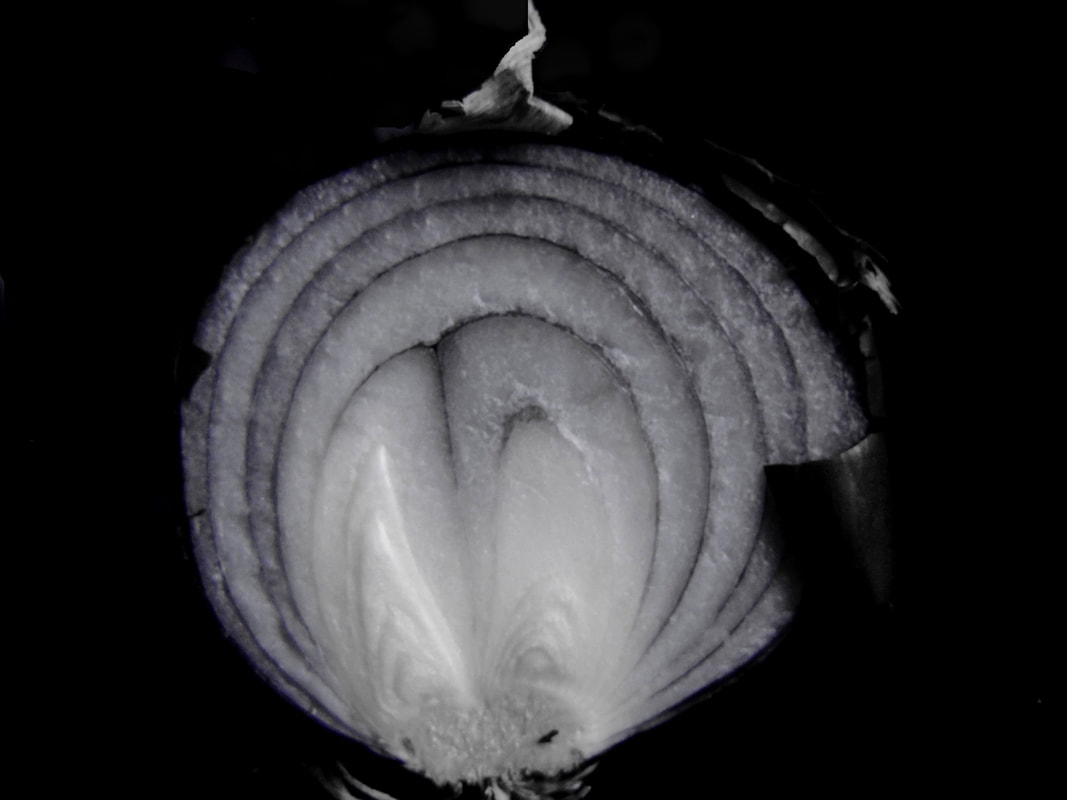
I like this image because of how u can see the textures on each individual layer of the onion. The onion is also directly in the centre and I have edited the picture using Pixlr. I used the select tool to create a completely black background so the only thing you can see is the white of the onion that is in the middle. I added a slightly blue tint over the image to give it cool tone.
This picture was taken in the plant pot shoot. To do this I placed an onion into a plant pot and faced it towards the natural light source of the window and took a picture. To shoot this photograph I used my Sony DLSR with the normal lens. I adjusted it to the monochrome mode. |
|
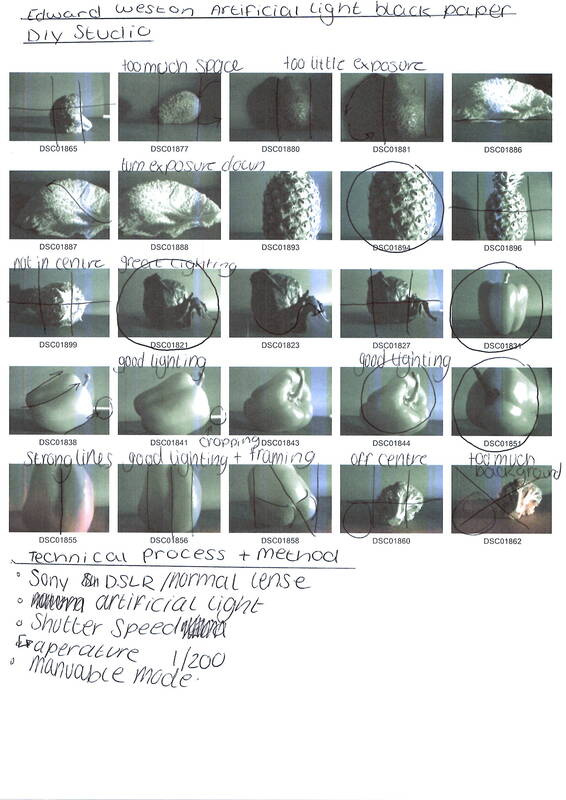
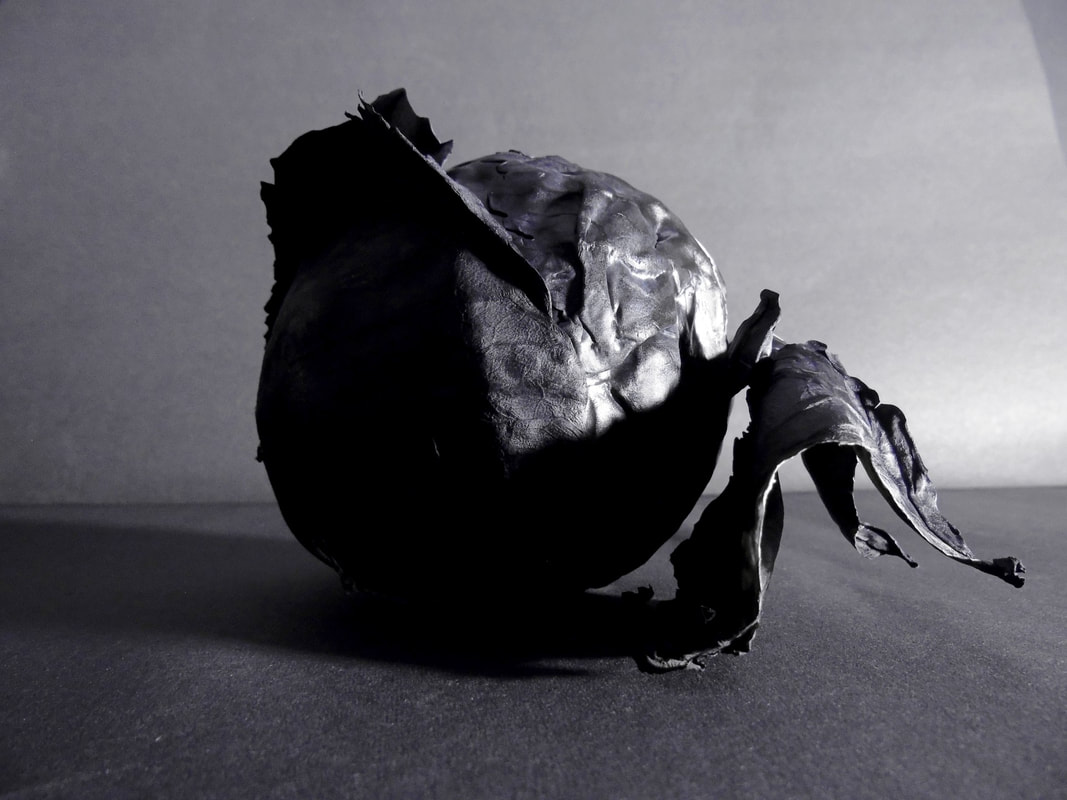
I chose this image because of how the cabbage is shaped. Its unusual shape draws your eyes towards it. The cabbage is in a blank background to draw you eyes to the main focal point of the image. I edited this image on Pixlr and used the curve tool in the adjust option to make enhance the darks and the lights of the image. The darks of the image make it almost look like a silhouette but then it contrasted by the portion of it that the light is shining onto.
This picture was taken in the artificial light shoot. To do this we made a background and floor out of black paper and used lights to shine onto one part of the background. To shoot this photograph I used my Sony DLSR with the normal lens. I adjusted it to the monochrome mode. |
|
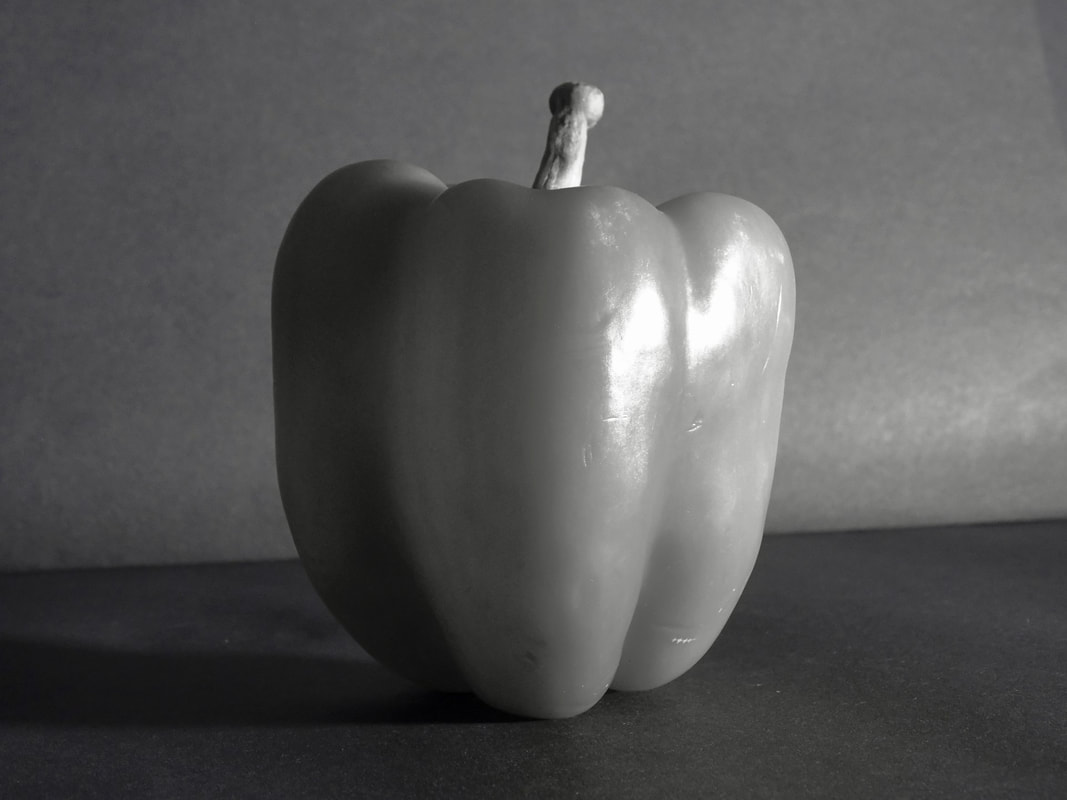
This is one of my best edits because of how I created they grey colour of the image. Although the background of my images are very light because of where my camera was positioned, I still think this shoot was very successful. I really like the simplicity of the single pepper on the plain grey background and how the shadow is placed. To edit this image I used Pixlr and made the darker bits of the image darker and made the lights lighter using the 'adjust' and 'curve' tools.
This picture was taken in the artificial light shoot. To do this we made a background and floor out of black paper and used lights to shine onto one part of the background. To shoot this photograph I used my Sony DLSR with the normal lens. I adjusted it to the monochrome mode. |
|
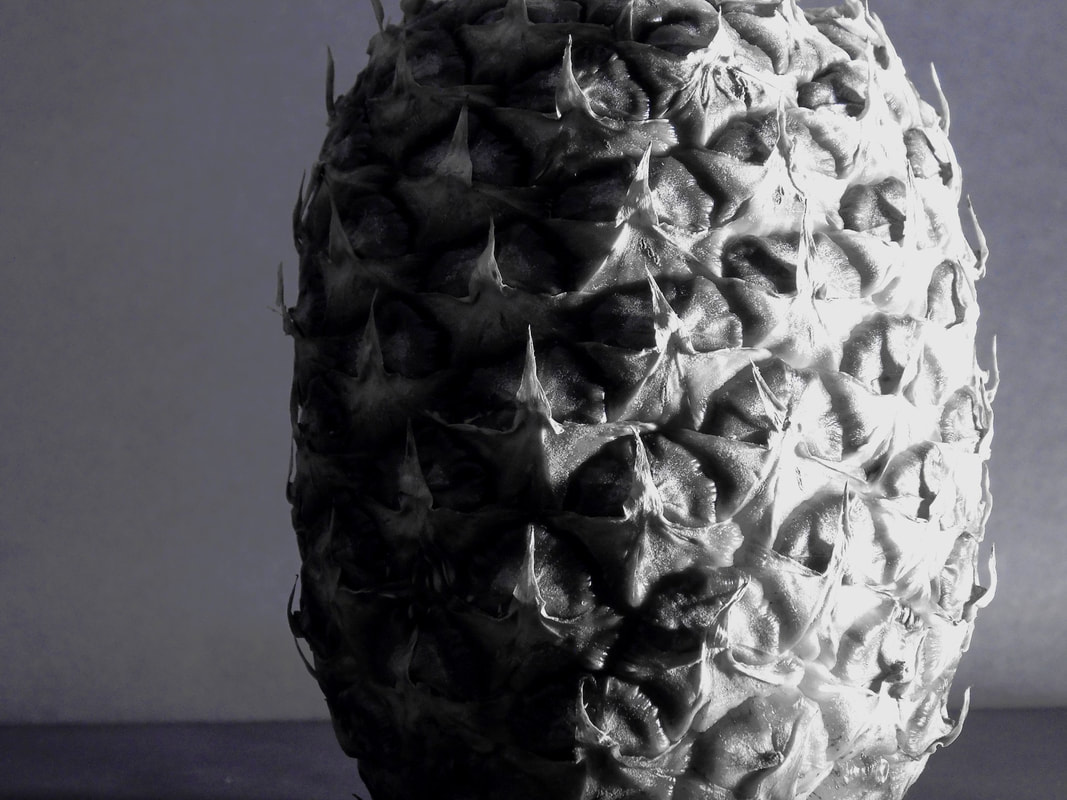
This image was quite successful because of how the light shines on only half of the pineapple. The opposing sides of the pineapple against the simplistic background gives a really nice effect. I think if I was so make this better I would tone down the exposure of the light side of the pineapple. To edit this image I used Pixlr and made the darker bits of the image darker and made the lights lighter using the 'adjust' and 'curve' tools.
This picture was taken in the artificial light shoot. To do this we made a background and floor out of black paper and used lights to shine onto one part of the background. To shoot this photograph I used my Sony DLSR with the normal lens. I adjusted it to the monochrome mode. |
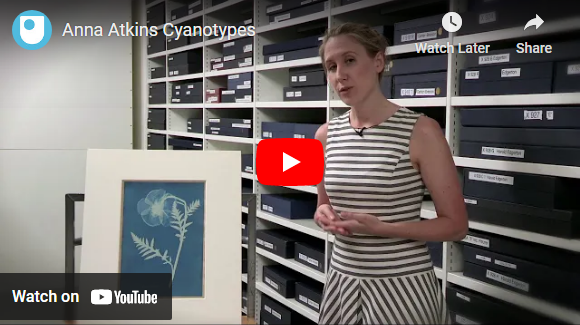
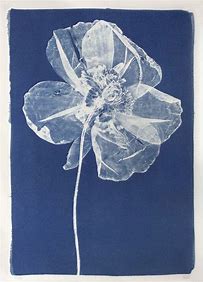
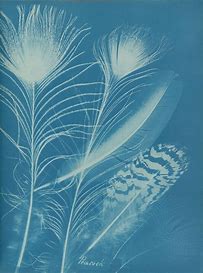
Abstraction through Cyanotypes / Anna Atkins
What are the advantages/disadvantages of cyanotype?
The process of cyanotypes is safe and cheap and easy to do. You can print on a various types of material. Also its a high contrast prints and it's very fast to print. Some artist today still use this method to make large and unique photographs. When making cyanotypes you need the sun light because it is a natural source of light so you must be outside or use a face tanner. Also if you have really light objects such as, leaves and thin pieces of thread or wire it could possibly get blown away by the wind. |
Who was Anna Atkins?
Anna Atkins (1799-1871) was an English botanist and photographer. She is often considered the first person to publish a book illustrated with photographic images. Some sources say that she was the first woman to create a photograph. What are cyanotypes? The cyanotype is a slow-reacting, economical photographic printing formulation sensitive to a limited near ultraviolet and blue light spectrum. They can also be described as a photographic blueprint. The cyanotype was invented in 1840 and did not include any dangerous chemicals inside of it. They do not involve using a camera to make them.
|


Abstraction through Photograms / Man Ray

|
Who was Man Ray?
Man Ray was a famous 20th century artist. (1890-1976). He was an American visual artist who spent most of his career in Paris. He was a significant contributor to the Dada and Surrealist movements. He produced major works in a variety of media but considered himself a painter above all. What are Photograms? Photograms are pictures that have been produced with no camera, and instead photographic materials, such as light-sensitive paper. They are developed by placing objects onto the light-sensitive paper and exposing it to light then producing shadowlike photographic images without the use of a negative or a camera What are the advantages and disadvantages of photograms?
Advantages to photograms is that they don't need any expensive cameras, all you need is light-sensitive paper. However, a disadvantage to producing photograms is that the technique displays the tones oppositely to the ones seen in reality, which might not have the desired look that someone wants. |

Horst P. Horst / The unfamiliar and abstracted


Technical Processes / High Key

|
What is High Key Photography?
high-key photography is a genre involving an almost completely white background and a subject. It’s produced by using a background that’s brighter than your subject. High key photographs have a minimal tonal range and don't havecontrast caused by harsh shadows. the overall colour palette is light. |


Shoot Plan / Karl Blossfeldt

|

|
This shoot was inspired by Karl Blossfeldt's work as we have been studying his techniques of abstract nature so I can emulate his work. The shoot will take place in doors so I can control which ways the light will shine onto my subject.
The props I am going to use are natural forms such as flowers, fruits and vegetables since these are in Karl's work. I will also use a white backdrop called Perspex, which will allow some light to pass through to the image.
I will use the school Canon DSLR 4000d camera with a macro lens and my Sony DSLR camera with the standard lens. The picture style will be taken with a filter over it to make it look aged and vintage. My camera will be set to an aperture of f/22 and have a shutter speed of one second for a larger depth of field.
Artist Investigation / Karl Blossfeldt
Nature educates us into beauty and inwardness and is a source of the most noble pleasure.
-Karl Blossfeldt

Why this video?
This video is inspirational to me because it shows how detailed and intricate Blossfeldt's work was. |
Why this artist?
After looking at the work of Horst. P. Horst and Man Ray I will now study the work of Karl Blossfeldt as he used the skill of high key photography. Who is he? Karl Blossfeldt was born on the 13th of June in 1865 and died on the 9th of December 1932. He was most famous for his close up photographs of plants and living things. Why this quote? I chose this quote as I feel that the message shows us how special nature is. It tells us how beauty can be found in such simple and common things that we often overlook. |


SEMI Analysis / Karl Blossfeldt

Acanthus mollis (Soft Acanthus, Bear’s, Breeches. Bracteoles with the Flowers Removed, Enlarged Four times)
1898-1928


|
Subject:
The photographer of this image is called Karl Blossfeldt. The title of this image is. "Acanthus mollis (Soft Acanthus, Bear’s, Breeches. Bracteoles with the Flowers Removed, Enlarged Four times) 1898-1928" The subject in this image is the plant: the acanthus mollis. Elements: Karl Blossfeldt uses several visual elements of art in his work to create this photograph. In my opinion, one of the strongest elements I can see is tone. In this image there is a range of values such as the dark ends of the leaves that contrast against the very light white middle of the leaves. Another element that I can see is texture. The amount of detail of the veins on the leaves make the image look three dimensional. Media: Not a lot is known about the equipment Blossfeldt used. He made his own cameras and managed to magnify details in his work. The main focus point of this image is the Acanthus mollis. Karl Blossfeldt has used the rule of thirds in his work to emphasise this. He also leads the viewers eyes to the subject of the photo by having a complete white background. Intent: I feel this photograph portrays a message of darkness against the the light. The dark veins of the plant look almost as if they are growing and taking over the white parts of the plant- this makes it look eerie and mysterious. |


Contact Sheet/ Karl Blossfeldt

|

|
Editing process/ Karl Blossfeldt
To edit the images from my Karl Blossfeldt shoot, i used the online editing software PIXLR-E. For the editing of my final images I focussed on 3 key areas: cropping, adjusting the background and amending the levels of the image. Below are some screenshots to explain and evidence this editing process.
1. Cropping the image using the rule of thirds:

2. Using the magic wand tool to select and edit the background.

3. Adjusting the levels of the image, for the best range of tones and contrast.

9 Best Images/ Karl Blossfeldt:


Artist Investigation / Dennis Wojtkiewicz


Why this video?
This video is inspirational to me because how he shows all of the details and colours of the fruits by backlighting them. Which I will try to emulate in my own work. |
Email Quote – Direct Artist Response Why this artist?
The final artist in the Abstract Nature project is Dennis Wojtkiewicz. This artist differs from my other artists because he uses bright colours unlike some of the other artists that I have researched who shoot in monochromatic. Dennis takes photographs before he creates his paintings so make them look more realistic. Who is he? Dennis Wojtkiewicz was born in 1956, Chicago, Illinois, United States, he is most famously known for his large scale paintings of fruit and flowers. His website is: www.wojtkiewiczart.com Why the quote? The quote is from a direct email response from Dennis Wojtkiewicz. From the email, I was able understand what equipment & techniques he uses such as a Canon EOS 90D camera with a Canon EF 100mm f/2.8 Macro USM fixed lens. |


Photographic Techniques / Back Lighting Fruit

|
Backlighting is the process of photography that includes illuminating the subject from the back. You place the backlight beneath you sheet of glass and take the photo of your image on top of the glass.
For this project we required the following equipment of a macro lens to see the details of the image or a reverse ring , two chairs , and a glass sheet , a bright artificial light , a thin piece of sliced fruit ( for example a grapefruit ,lemon or kiwi) and a camera. |


|
Step 1 :
Thinly slice a fruit |
Step 2 :
Position the back light to be directly under the glass. |
Step 3 :
Change your camera settings to best suit high key photography. |
Step 4 :
Use a shutter release cable to take your images for an outcome that isn't blurry and in detail.. |
Shoot Plan / Dennis Wojtkiewicz
|
This shoot was inspired by the work of Dennis Wojtkiewicz. He uses the technique of backlighting to create images to work from when he paints. The main feature he uses is bright and vivid colours. This shoot will be done in doors so I can completely control the lighting of my image. My light will be placed underneath a sheet of glass that is in-between two chairs. My fruit will be placed on top of the glass sheet and the light will shine through it and expose all of the small details. For this shoot I also used my Sony DSLR camera with the standard kit lens with an aperture of f/8 - f/12 for better image quality. It will have a slow shutter speed to let lots of light into the image.
|

|
Final Outcome / Explosion Sketchbook


|

|
Post Editing/Dennis Wojtkiewicz
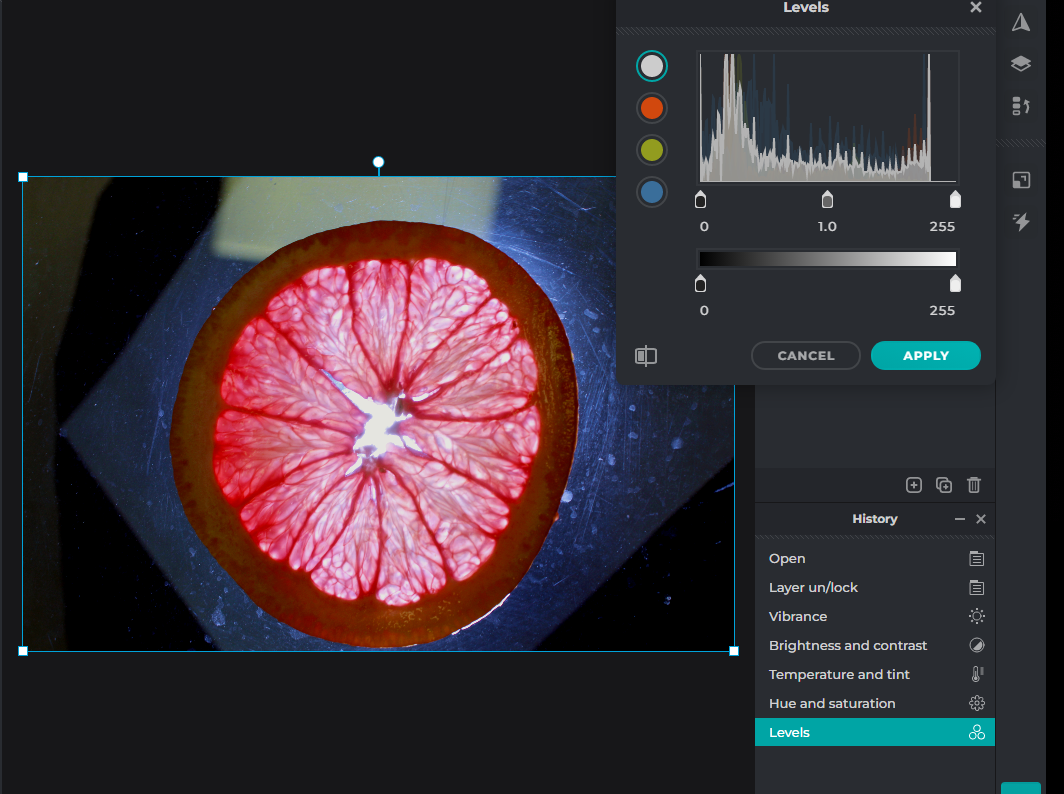
Editing Step 1 : In this clip, I used the adjustment tools to enhance the colour, saturation and contrast within my images. This helped me to amend my expose and bring forth fine detail within the fruit.
|
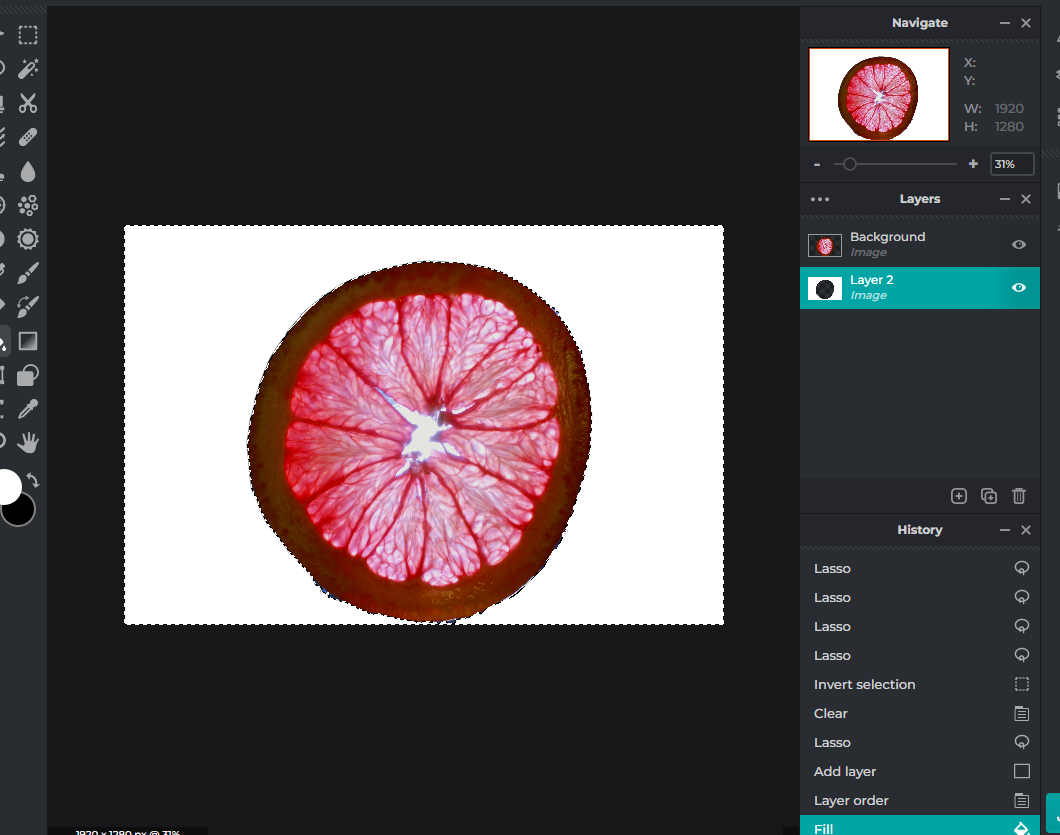
Editing Step 2 : In this screenshot I used the lasso tool to cut around the outside of the fruit. I then deleted the background and made it white using the paint bucket tool.
|

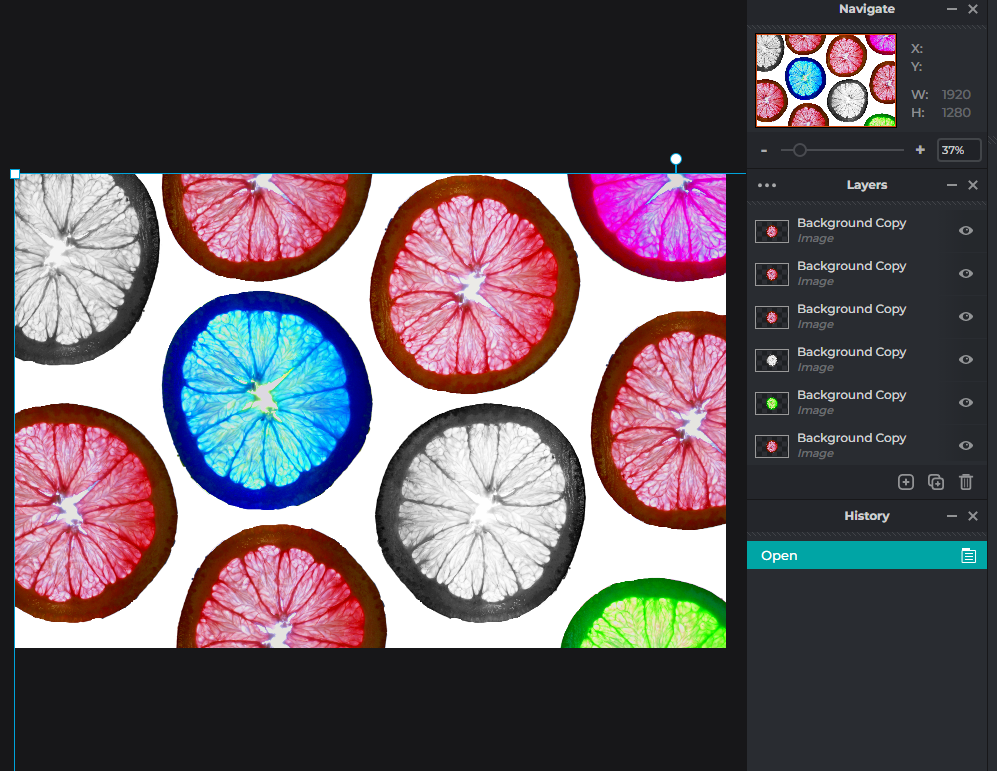
Editing Step 3 : using PIXLR I resized and duplicated my image. Once I had duplicated it, I then flipped the images in different ways and continued this for each one.
|
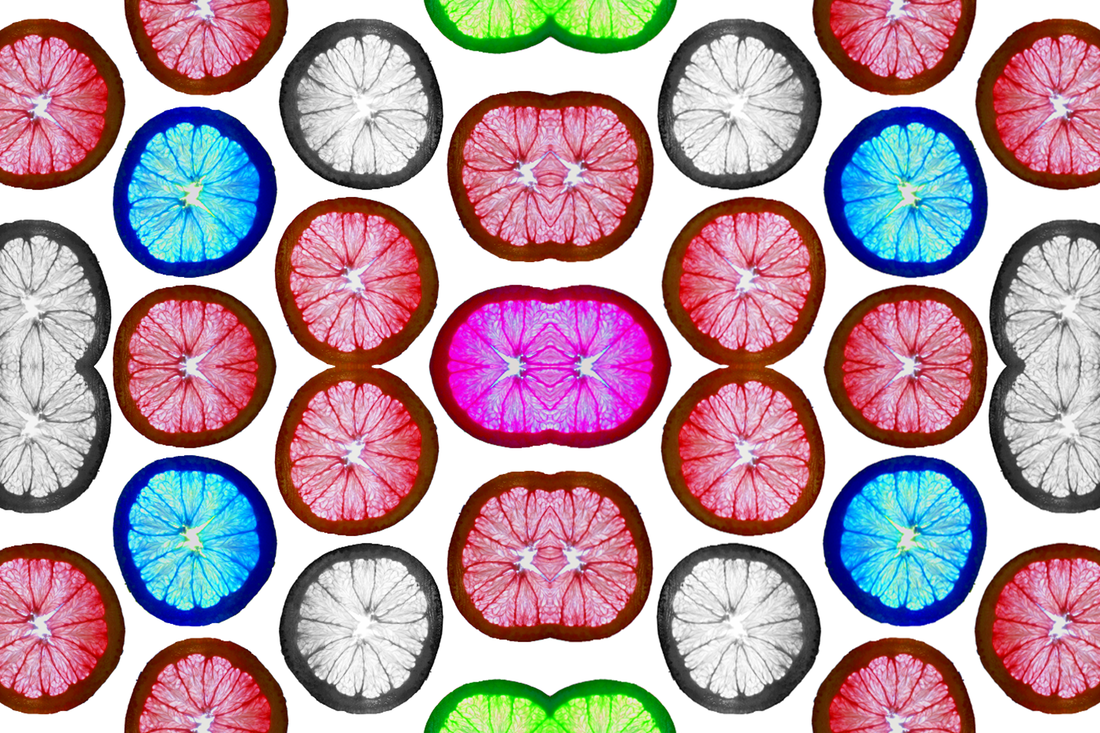
Editing Step 4 : Finally I used the 'Auto B&W' tool to change two of the fruits into black and white. I also used the brightness tools to enhance the details. I then, used the saturation and hue tools to create different bright colours of three fruits.
|
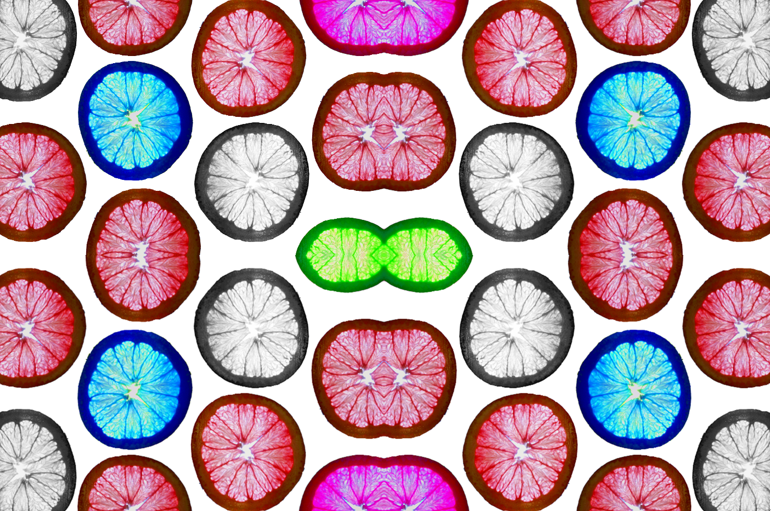
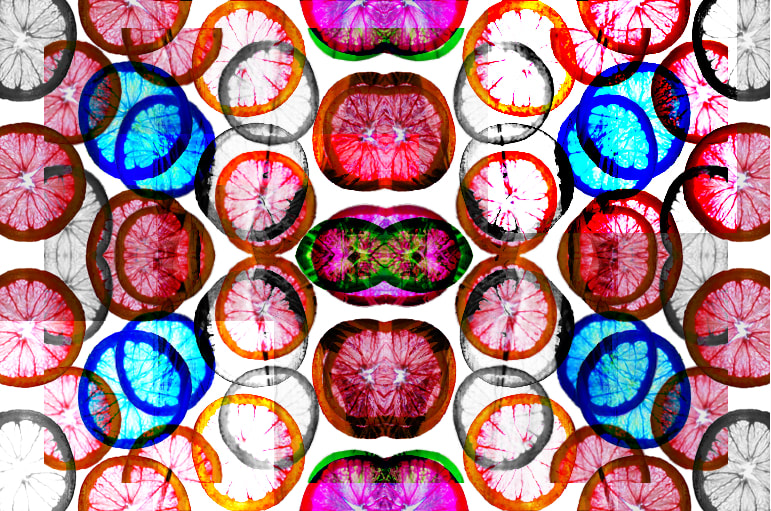
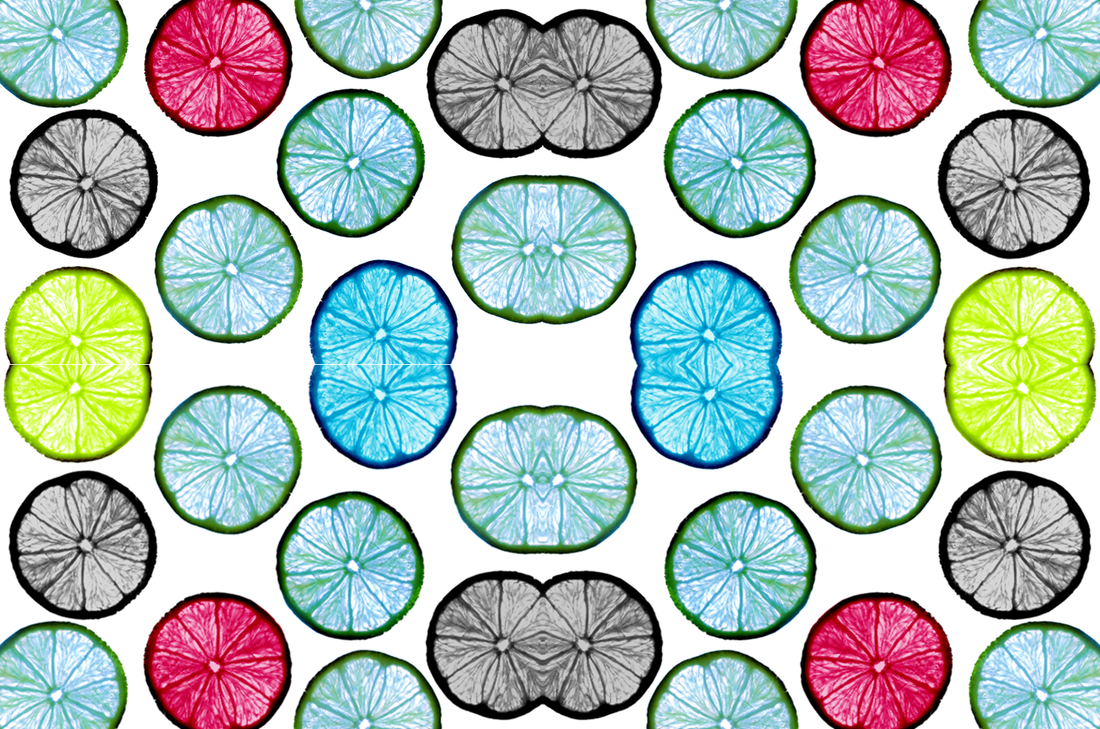
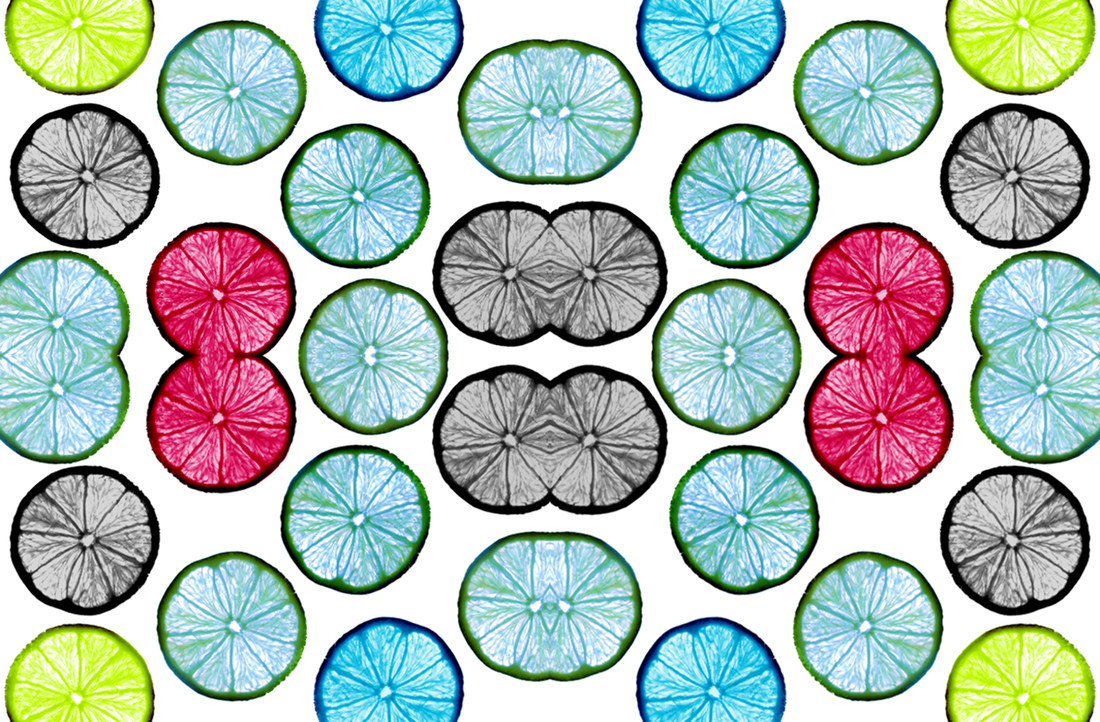
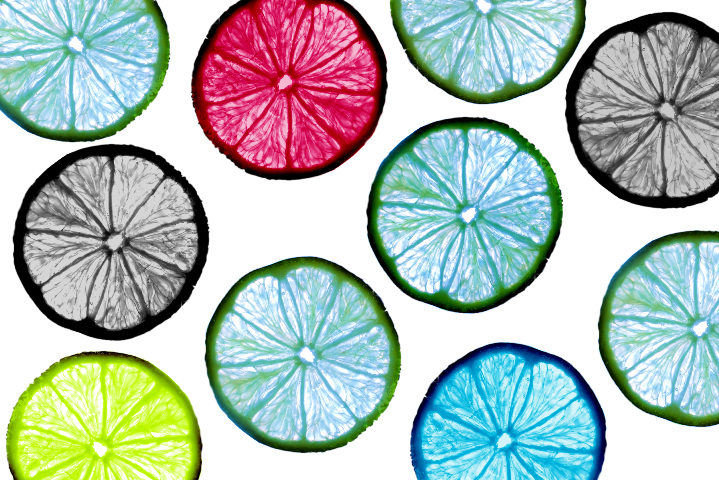
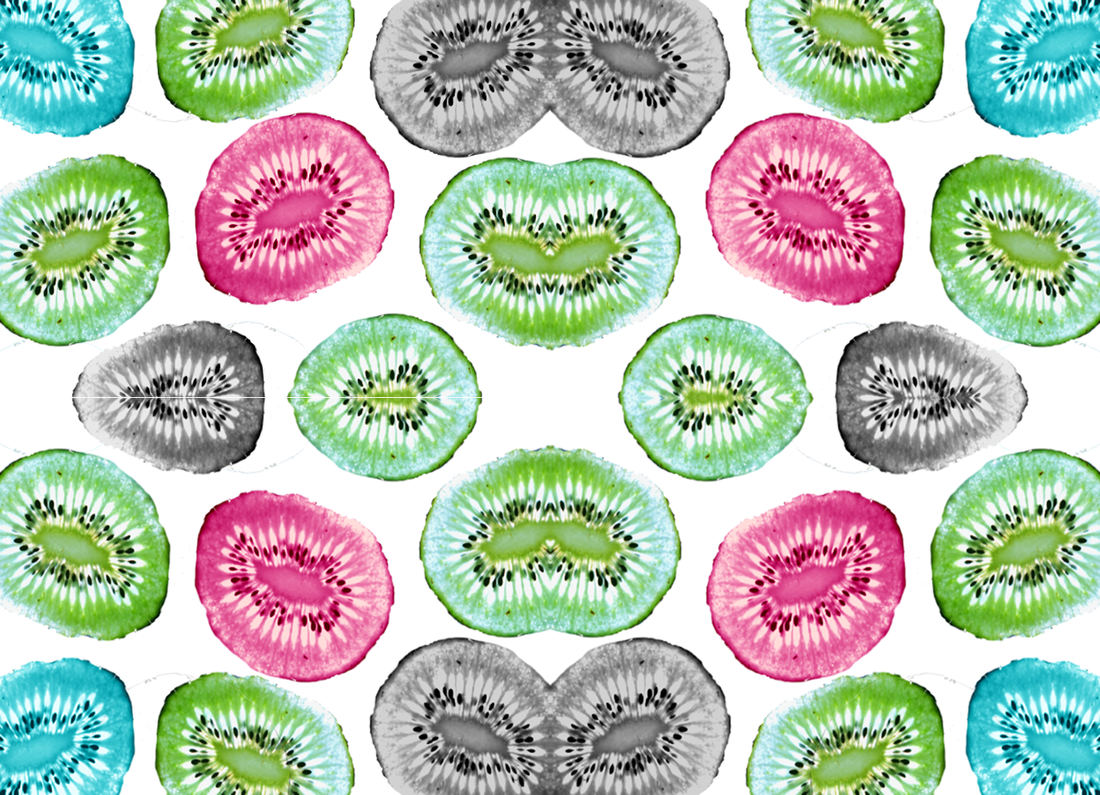
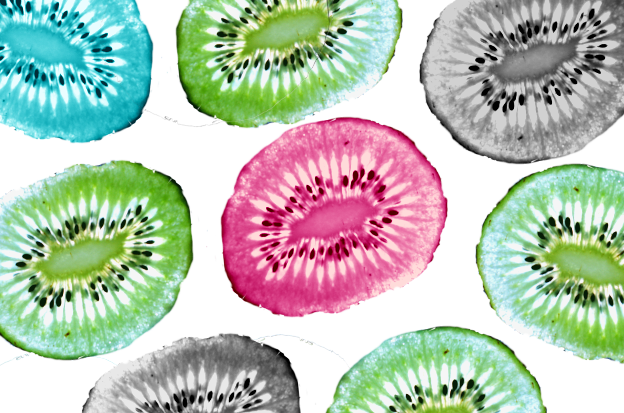
Rotational Designs / Dennis Wojtkiewicz
Using rotational symmetry and the work of Horst P Horst, I have created a series of rotational designs using the abstract elements of shape, colour, form, tone, repetition and harmony. I will develop these further using pixlr.

|

|
|
|

|
|


|

|

Abstract Nature / Hand Manipulation Sample Boards


Abstract Nature / Final Evaluation
Throughout this project I have developed my understanding of abstract photography by exploring the theme of nature. During this photography course, I was able to gain skill and knowledge about the topic in nature.
We initially studied the work of Edward Weston who inspired me with his simple yet fascinating monochrome work. I researched an image that particularly caught my interest such as "Pepper No.30". Before this project I had little to no knowledge of different photography techniques, But through studying this artist I was able to explore the concept of line, shape and harmony in my own photography examples. Edward Weston uses the tone in his images cleverly to his advantage. Inspired by his work, I created a series of emulations by setting up a monochrome photography shoot in school. Edward Weston's work helped me in my own emulations because he uses techniques such as: the rule of thirds, leading lines and monochrome photography. Overall, I think my attempt at recreating his work was quite successful as I was able to capture his signature techniques, considering the equipment we have in todays times.
The second artist we studies was called Anna Atkins, a 19th century English botanist and photographer. She uses the technique of Cyanotypes, which linked extremely well with our topic. The intricate process of how she creates her prints intrigued and inspired me. To emulate her work myself, I took inspiration from her pieces with flowers and leaves on them. My prints came out very successful with a rich blue colour with white in the place the flowers and leaves once where, creating the most intriguing and delicate looking outcome. I also gained the skill of using an UV light to develop my work.
We then briefly looked at an artist called Man Ray who uses the technique of a dark room to create photograms. Although I didn't get to emulate this work myself, I thoroughly enjoyed looking at the work he created.
I then began to look at the work of a fashion photographer named Horst P. Horst and his use of rotational symmetry. His work shows such detail in the texture and patterns he creates; he also used symmetry. I created 9 emulations of his work using my monochrome shoot, and another 9 using his technique on my cyanotype images. I feel I managed to create several successful outcomes which resemble Horst's work. Studying this artist, helped me to understand how to edit my images and create lots of final images of the same picture but rotated in different ways.
Next, I studied the work of Karl Blossfeldt, a German still life photographer. His work inspired me and helped me to understand how to capture the beauty and detail in the most simple things, such as a plant from your garden; where Karl actually got most of his subjects. His work involved him using a simple plain background and placing a plant over the top of it to create a semi-abstract contrast. In class I made an attempt to emulate his work. Although I was happy with the initial pictures I had taken, The editing process was not a strong point for me. If I was to do it again, I would develop my knowledge of my editing software and put more time and effort into it to make it the best outcome I could possibly have. Overall, I felt I did not successfully recreate Karl Blossfeldt's work.
Finally, I investigated the work of Dennis Wojtkiewicz. I was inspired by his use of photography in his art work. He takes photographs of his subject before to make them look more realistic. He uses lots of bright and vibrant colours in his work, so I was excited to emulate it. I feel my final outcome was very successful and I completed three different images in total. Overall, I think this was my favourite photographer to study to work of. For my emulation I had to use my knowledge of pixlr to crop out my fruit which I had taken in my backlighting shoot the day prior. I then had to duplicate and move my image in different ways to create a really cool effect.
To summarise, I think my most successful outcomes were my Dennis Wojtkiewicz rotational symmetry work. I feel my final outcome from my mock was very successful and I really enjoyed doing it. However, another project I felt I was successful and confident in was my Edward Weston work. My SEMI analysis was detailed and my shoot came out much better than I had expected. I fell I have emulated his work very well. These helped me to develop my understanding and knowledge of the subject and the techniques.
I felt I had quite a few weaknesses in this project. Mostly my camera was to blame and I did not fully understand how to use it. If I was to do it again I would research how to use my camera correctly so I can get the best possible outcomes. My Karl Blossfeldt emulation was also not a very strong point for me. I really struggled to properly emulate his amazing work of tones and lines. I also feel that some of my work lacked the best annotations I could do. However, next project I incorporate everything I learnt in this one to make sure it is at the best standard it could possible be.
